个人技术总结与洞见

0%

CAP定理是分布式系统中的一个基本定理,它指出任何分布式系统最多可以具有以下三个特性中的两个:

  • Consistency(一致性)
  • Availability(可用性)
  • Partition tolerance(分区容错)

1. 分布式系统

考虑一个非常简单的分布式系统。系统由两台服务器组成G1和G2,这两台服务器跟踪相同的变量v,v的初始值为v0。G1和G2相互间可以通信,同时也与第三方客户端通信。系统结构如下:

system_architecture

客户端可以向任何服务器发起读写请求。当一个服务器收到请求后,它执行计算并向客户端返回响应。请求写的过程如下:

write_flow

请求读的过程如下:

read_flow

2. 一致性

一致性的意思是

任何写操作之后的读操作,必须返回该值

在一致性系统中,一旦一个客户端成功的向任何服务器写入值后,它期望能够从任何一个服务器获得该值(或最新的值)。

如下图是一个非一致性系统的例子,客户端向G1成功写入v1,但当客户端从G2读取v的值时,其获得的结果是v0

inconsistent_system

一个一致性系统如下图所示,G1会先将v值复制给G2,再向客户端响应写入结果,当客户端从G2读取值时,其获得的是最新的值v1

consistent_system

3. 可用性

可用性的意思是

系统中的非故障节点必须为接收到的每个请求产生一个响应

在一个可用系统中,如果客户端向任何一个服务器发送请求,只要服务器没有崩溃,服务器最终必须产生一个响应,而不能忽略该请求。

如用户可以选择向 G1 或 G2 发起读操作,不管是哪台服务器,只要收到请求,就必须告诉用户,到底是 v0 还是 v1,否则就不满足可用性。

4. 分区容错

分区容错的意思是

网络允许丢弃节点间传递的任意多个消息(the network will be allowed to lose arbitrarily many messages sent from one node to another)

大多数分布式系统都分布在多个子网络,每个子网络就叫做一个区(partition)。分区容错的意思是,区间通信可能失败。比如,一台服务器放在中国,另一台服务器放在美国,这就是两个区,它们之间可能无法通信。如果所有的通信都被丢弃,系统如下图所示。

partition_tolerance

在一个支持分区容错的系统中,我们的系统必须能够在任意网络分区的情况下正常工作。

5.证明

接下来证明一个系统不能同时满足这三个特性。

假设存在一个系统同时具有一致性、可用性和分区容错性。首先对系统进行划分,结果如下:

partition_tolerance

接下来,客户端向G2服务器请求写v1,因为系统是可用的,故G2会返回响应。但是因为网络被隔离,G2无法向G1同步更新v1

proof_step_2

最后,客户端会向G1和G2分别请求v的值,因为系统是可用的,G1和G2会分别返回v0和v1,导致了不一致

proof_step_3

因为我们假设存在一个系统具有一致性、可用性和分区容错性,但是我们证明了对于任何这样的系统都存在一种情况导致系统的不一致性。因此,不存在一个同时满足这三个特性的系统。

6. 一致性和可用性间的矛盾

一致性和可用性,为什么不可能同时成立?从上述的证明可以看到因为通信可能会失败(即出现分区容错)。

如果保证 G2的一致性,那么 G1必须在写操作时,锁定 G2 的读操作和写操作。只有数据同步后,才能重新开放 G2读写。锁定期间,G2 不能读写,没有可用性

如果保证 G2 的可用性,那么势必不能锁定 G2,所以一致性不成立

综上所述, G2 无法同时做到一致性和可用性。系统设计时只能选择一个目标。如果追求一致性,那么无法保证所有节点的可用性;如果追求所有节点的可用性,那就没法做到一致性。

如果一个系统同时支持可用性和一致性,一般这个系统是非分布式系统。

举例来说,发布一张网页到 CDN,多个服务器有这张网页的副本。后来发现一个错误,需要更新网页,这时只能每个服务器都更新一遍。一般来说,网页的更新不是特别强调一致性。短时期内,一些用户拿到老版本,另一些用户拿到新版本,问题不会特别大。当然,所有人最终都会看到新版本。所以,这个场合就是可用性高于一致性。

three_ indicators

参考

  1. https://mwhittaker.github.io/blog/an_illustrated_proof_of_the_cap_theorem/
  2. http://www.ruanyifeng.com/blog/2018/07/cap.html

1. 分层封装

在大多数应用中我们都是将代码分层封装(如Clean架构),如下:

1
2
3
4
5
6
7
8
9
10
11
12
13
14
15
16
17
18
com.awesome.project
.common
StringUtils
ExceptionUtils
.controllers
LocationController
PricingController
.domain
Address
Cost
CostFactory
Location
Price
.repositories
LocationRepository
PriceRepository
.services
LocationService

分层封装比较流行的原因可能是开发人员能够很容易发现功能相似的代码,同时也符合人们“习惯于对事物进行分类”的思想,但是分层封装会带来如下问题:

  • 添加或修改业务时需要跨多层修改代码
  • 在某一层中封装的代码通常是不相关的(如LocationRepository和PriceRepository)
  • 不同的开发人员对不同的代码层应该包含的功能有不同的认知,因此需要时间统一大家的认知,对新人需要进行统一的培训
  • 把某一个domain提取成单独的微服务并不容易
  • 更多的分层意味着更高的复杂性
  • 开发人员需要时间来思考代码应该放到哪个分层
  • 随着业务越来越复杂和对架构缺少守护,分层架构会越来越腐化,远远偏离最初的架构设计

    2. 按特性(或domain)封装

考虑到分层分装的问题,我们可以按特性或domain对代码进行封装,比如:

1
2
3
4
5
6
7
8
9
10
11
12
13
14
15
16
17
com.awesome.project.component
.location
Address
Location
LocationController
LocationRepository
LocationService
.platform
StringUtils
ExceptionUtils
.price
Cost
CostFactory
Distance
Price
PriceController
PriceRepository

这种结构化代码的方更符合OO原则,可以做到业务高内聚,不仅能够解决分层封装代码的问题,同时具有如下优势:

  • 开发人员更聚焦于业务,而不至于花时间如何组织我们的代码
  • 从DDD的角度出发,开发人员可以很容易的找到某一个domain下的聚合根,比如price包中的Price类肯定是聚合根,因为我们可以通过PriceRepository直接获得Price,而Cost很可能被Price使用,因为我们无法直接获得它
    使用这种封装方式要解决的首要问题是:应用业务规则往往是由多个领域的业务规则组合完成的,在哪里完成这些领域业务规则的组合呢?不同的开发人员可能有不同的解决方法,比如将Controller提出到单独一个层:
    1
    2
    3
    4
    5
    6
    7
    8
    9
    10
    11
    12
    13
    14
    15
    16
    17
    18
    19
    com.awesome.project
    .controller
    LocationController
    PriceController
    .component
    .location
    Address
    Location
    LocationRepository
    LocationService
    .platform
    StringUtils
    ExceptionUtils
    .price
    Cost
    CostFactory
    Distance
    Price
    PriceRepository

1. 什么是Semaphore和线程池

Semaphore称为信号量,是java.util.concurrent一个并发工具类,用来控制可同时并发的线程数,其内部维护了一组虚拟许可,通过构造器指定许可的数量。线程在执行时,需要通过acquire()获得许可后才能执行,如果无法获得许可,则线程将一直等待;线程执行完后需要通过release()释放许可,以使得其他线程可以获得许可。

线程池也是一种控制任务并和执行的方式,通过线程复用的方式来减小频繁创建和销毁线程带来的开销。一般线程池可同时工作的线程数量是一定的,超过该数量的线程需进入线程队列等待,直到有可用的工作线程来执行任务。

使用Seamphore,一般是创建了多少线程,实际就会有多少线程并发执行,只是可同时执行的线程数量会受到信号量的限制。但使用线程池,创建的线程只是作为任务提交给线程池执行,实际工作的线程由线程池创建,并且实际工作的线程数量由线程池自己管理。

2. Semaphore和线程池的区别

先亮结果,Semaphore和线程池的区别如下:

  • 使用Semaphore,实际工作线程由开发者自己创建;使用线程池,实际工作线程由线程池创建
  • 使用Semaphore,并发线程的控制必须手动通过acquire()release()函数手动完成;使用线程池,并发线程的控制由线程池自动管理
  • 使用Semaphore不支持设置超时和实现异步访问;使用线程池则可以实现超时和异步访问,通过提交一个Callable对象获得Future,从而可以在需要时调用Future的方法获得线程执行的结果,同样利用Future也可以实现超时

接下来用示例说明结果:

1. 使用Semaphore

1
2
3
4
5
6
7
8
9
10
11
12
13
14
15
16
17
18
19
20
public static void testSemaphore() {
Semaphore semaphore = new Semaphore(2);
for (int i = 0; i < 6; i++) {
Thread thread = new Thread() {
public void run() {
try {
semaphore.acquire();
System.out.println(Thread.currentThread().getName() + " start running");
Thread.sleep(2000);
System.out.println(Thread.currentThread().getName() + " stop running");
semaphore.release();
} catch (InterruptedException e) {
e.printStackTrace();
}
}
};
thread.setName("Semaphore thread " + i);
thread.start();
}
}

输出结果如下:

1
2
3
4
5
6
7
8
9
10
11
12
Semaphore thread 0 start running
Semaphore thread 1 start running
Semaphore thread 0 stop running
Semaphore thread 1 stop running
Semaphore thread 2 start running
Semaphore thread 3 start running
Semaphore thread 3 stop running
Semaphore thread 2 stop running
Semaphore thread 4 start running
Semaphore thread 5 start running
Semaphore thread 5 stop running
Semaphore thread 4 stop running

通过输出可以发现:

  • 每次最多打印两个start running记录,因为Seamphore的信号量是2
  • 只有当其他线程释放了Seamphore后,新的线程才能开始执行
  • 线程的名字以 Semaphore thread开头,且每个执行线程的名字都不相同

2. 使用线程池

1
2
3
4
5
6
7
8
9
10
11
12
13
14
15
16
17
18
19
20
21
22
public static void testThreadPool() {
ExecutorService executorService = new ThreadPoolExecutor(2, 5,
0L, TimeUnit.MILLISECONDS,
new LinkedBlockingQueue<Runnable>());

for (int i = 0; i < 6; i++) {
Thread thread = new Thread() {
public void run() {
try {
System.out.println(Thread.currentThread().getName() + " start running");
Thread.sleep(2000);
System.out.println(Thread.currentThread().getName() + " stop running");
} catch (InterruptedException e) {
e.printStackTrace();
}
}
};
thread.setName("ThreadPool thread " + i);
executorService.submit(thread);
}
executorService.shutdown();
}

输出结果如下:

1
2
3
4
5
6
7
8
9
10
11
12
pool-1-thread-2 start running
pool-1-thread-1 start running
pool-1-thread-1 stop running
pool-1-thread-2 stop running
pool-1-thread-2 start running
pool-1-thread-1 start running
pool-1-thread-2 stop running
pool-1-thread-1 stop running
pool-1-thread-2 start running
pool-1-thread-1 start running
pool-1-thread-1 stop running
pool-1-thread-2 stop running

通过输出可以发现:

  • 每次最多打印两个start running记录,因为线程池的核心容量是2,多余的线程任务放到阻塞队列等待
  • 两个线程的名字,即pool-1-thread-1和pool-1-thread-2,不是开发者自己创建的,而是线程池创建的
  • 任务的执行和结束都是由线程池来完成,开发者只需要将任务提交给线程池即可

3. 用Semaphore实现互斥锁

使用信号值为1的Semaphore对象便可以实现互斥锁,示例如下:

1
2
3
4
5
6
7
8
9
10
11
12
13
14
15
16
17
18
public static void testSemaphoreMutex() {
Semaphore semaphore = new Semaphore(1);
for (int i = 0; i < 6; i++) {
new Thread() {
public void run() {
try {
semaphore.acquire();
System.out.println(Thread.currentThread().getName() + " get semaphore");
Thread.sleep(2000);
System.out.println(Thread.currentThread().getName() + " release semaphore");
semaphore.release();
} catch (InterruptedException e) {
e.printStackTrace();
}
}
}.start();
}
}

输出结果如下:

1
2
3
4
5
6
7
8
9
10
11
12
Thread-0 get semaphore
Thread-0 release semaphore
Thread-1 get semaphore
Thread-1 release semaphore
Thread-2 get semaphore
Thread-2 release semaphore
Thread-3 get semaphore
Thread-3 release semaphore
Thread-4 get semaphore
Thread-4 release semaphore
Thread-5 get semaphore
Thread-5 release semaphore

可以看出,任何一个线程在释放许可之前,其它线程都拿不到许可。这样当前线程必须执行完毕,其它线程才可执行,这样就实现了互斥。

4. Semaphore的易错点

使用Semophore时有一个非常容易犯错误的地方,即先release再acqure后会导致Semophore管理的虚拟许可额外新增一个,示例如下:

1
2
3
4
5
6
7
8
9
10
public static void firstReleaseThenAcquire() throws InterruptedException {
Semaphore semaphore = new Semaphore(1);
System.out.println("Init permits: " + semaphore.availablePermits());
semaphore.release();
System.out.println("Permits after first releasing:" + semaphore.availablePermits());
semaphore.acquire();
System.out.println("Permits after first acquiring:" + semaphore.availablePermits());
semaphore.acquire();
System.out.println("Permists after second acquiring:" + semaphore.availablePermits());
}

输出结果如下:

1
2
3
4
Init permits: 1
Permits after first releasing:2
Permits after first acquiring:1
Permists after second acquiring:0

可以发现,虽然Semophore的初始信号量为1,但是当先调用release()后,Semophore的信号量变为2了,因此才能够连续调用两次acquire()都能获得许可。

Spring Security 是一个能够为基于 Spring 的企业应用系统提供声明式的安全访问控制解决方案的安全框架。它提供了一组可以在 Spring 应用上下文中配置的 Bean,充分利用了 Spring IoC(Inversion of Control 控制反转),DI(Dependency Injection 依赖注入)和 AOP(面向切面编程)功能,为应用系统提供声明式的安全访问控制功能,减少了为企业系统安全控制编写大量重复代码的工作。

Spring Security 拥有以下特性:

  • 对身份认证和授权的全面且可扩展的支持
  • 防御会话固定、点击劫持,跨站请求伪造等攻击
  • 支持 Servlet API 集成
  • 支持与 Spring Web MVC 集成
  • 其他的特性

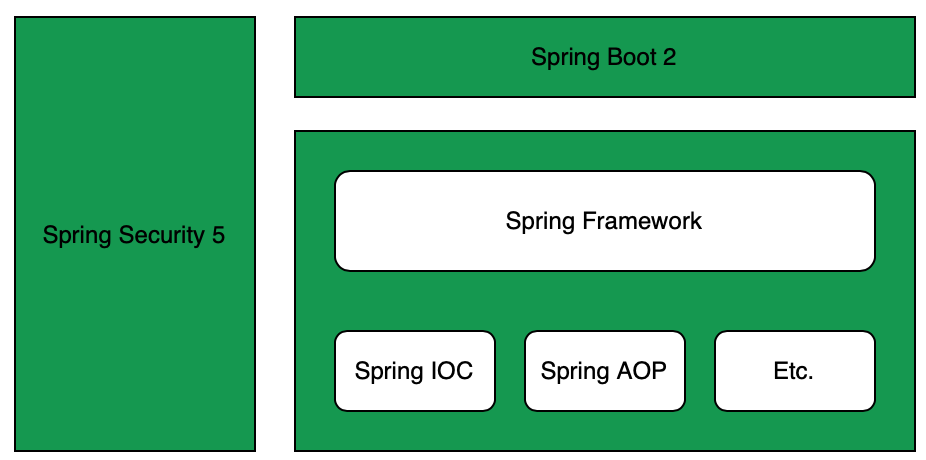
Spring Security与Spring和Spring Boot的关系如下:

image-20200224100517215

目前Spring Security提供以下安全技术或支持与现有技术集成:

  • In-Memory认证
  • JDBC认证
  • LDAP认证
  • Active Directory认证
  • Remember-Me认证
  • OpenID
  • 匿名认证
  • JAAS(Java Authentication and Authorization) Provider
  • CAS认证
  • X.509认证
  • Basic And Digest认证
  • OAuth 2.0
  • SAML2

接下来先介绍Spring Security的核心组件开始。

1. 核心组件 - SecurityContextHolder, SecurityContext and Authentication

最基本的对象是SecurityContextHolder,它存储当前应用程序安全上下文的详细信息,其中包括当前使用应用程序的主体(通常是用户)的详细信息。如当前操作的用户是谁,该用户是否已经被认证,他拥有哪些角色权限等。默认情况下,SecurityContextHolder使用 ThreadLocal 来存储这些详细信息,这意味着 Security Context 始终可用于同一执行线程中的方法,即使 Security Context 未作为这些方法的参数显式传递。考虑到在用户请求被处理后,Spring Security会自动清除线程,因此使用ThreadLocal 是线程安全的。

SecurityContextHolder支持三种安全策略:

  • SecurityContextHolder.MODE_THREADLOCAL: 每个线程有其自己的SecurityContextHolder
  • SecurityContextHolder.MODE_INHERITABLETHREADLOCAL: 继承自安全线程的线程与安全线程有相同的安全标识
  • SecurityContextHolder.MODE_GLOBAL:所有线程共享相同的SecurityContextHolder

可能通过配置spring.security.strategy系统属性来设置SecurityContextHolder的安全策略,但是大多数应用程序不需要修改SecurityContextHolder安全策略。

1.1 获取当前用户信息

SecurityContextHolder存储了当前与应用程序交互的用户信息,并且用户信息与当前执行线程已绑定。 在Spring Security中使用Authentication类代表用户信息,并且可以使用如下代码块在代码的任意处获得当前已验证用户的用户名:

1
2
3
4
5
6
7
(1)Object principal = SecurityContextHolder.getContext().getAuthentication().getPrincipal();

if (principal instanceof UserDetails) {
String username = ((UserDetails)principal).getUsername();
} else {
String username = principal.toString();
}

(1) getContext()获得的是SecurityContext接口的实例,而该实例存储在ThreadLocal中(分析见附录-代码1),代表当前线程需要的最少的安全信息。SecurityContext接口中定义了两个方法,代码如下:

1
2
3
4
public interface SecurityContext extends Serializable {
Authentication getAuthentication();
void setAuthentication(Authentication authentication);
}

并且通过跟踪代码可以确getPrincipal()返回的是UserDetails实例(分析见附录-代码1)。

1.2 Authentication

SecurityContext.getAuthentication()返回的Authentication也是一个接口,它的定义如下:

1
2
3
4
5
6
7
8
9
10
11
12
13
// org.springframework.security.core.Authentication.java
public interface Authentication extends Principal, Serializable {
// 权限信息列表,默认是GrantedAuthority接口的一些实现类,通常是代表权限信息的一系列字符串
Collection<? extends GrantedAuthority> getAuthorities();
// 凭证信息以证明主体的正确性,如用户在前端输入的密码
Object getCredentials();
// 其他信息,如IP地址,证书序列号等
Object getDetails();
// 主体的标识,如用户名,大部分情况下返回的是UserDetails接口的实例
Object getPrincipal();
boolean isAuthenticated();
void setAuthenticated(boolean isAuthenticated) throws IllegalArgumentException;
}

Authentication 直接继承自 Principal 类,而Principal是位于 java.security 包中。通过Authentication 接口的实现类,我们可以得到用户拥有的权限信息列表,密码,用户细节信息,用户身份信息,认证信息等。

1.2.1 UserDetailService

Authentication代码可知,可以通过其中的getPrincipal()方法获得安全主体,虽然返回的是Object对象,但大多数情况下我们可以将其转为UserDetails对象UserDetails是Spring Security的核心类,代表一个安全主体并且是高度可扩展的,代码如下:

1
2
3
4
5
6
7
8
9
public interface UserDetails extends Serializable {
Collection<? extends GrantedAuthority> getAuthorities();
String getPassword();
String getUsername();
boolean isAccountNonExpired();
boolean isAccountNonLocked();
boolean isCredentialsNonExpired();
boolean isEnabled();
}

这里需要注意的是UserDetailsgetPassword()AuthenticationgetCredentials()的不同:前者是用户正确的密码,后者是用户提交的密码凭证。

SecurityContextHolder中用UserDetails存储安全主体信息,但是在应用程序中我们需要的安全主体信息可能更多(如需要email, empolyeeNumber等),此时我们可以通过继承UserDetails接口实现自定义安全主体并存储在SecurityContextHolder中,从而在使用时可以将SecurityContextHolder中获得的UserDetails实例转换为自定义的实例。因此我们可以将UserDetails认为是应用程序和Spring Security框架之间的适配器

为了向SecurityContextHolder中提供自定义的UserDetails,只需要实向Spring容器中注册一个实现了UserDetailsService接口的Bean即可,模板代码如下:

1
2
3
4
5
6
7
@Service
publiic class AuthUserDetailsService implements UserDetailsService {
@Override
(2)public UserDetails loadUserByUsername(userName: String) {
//你的逻辑
}
}

(2)只需要在loadUserByUsername接口中添加定制的业务逻辑即可

Spring Security也提供了一些UserDetailsService的实现,如InMemoryDaoImpl)和JdbcDaoImpl但是不管如何提供UserDetailsService的实现,都可以通过SecurityContextHolder获得UserDetailsService返回的数据

1.2.2 GrantedAuthority

除了主体,另一个Authentication提供的重要方法是getAuthorities()。这个方法提供了GrantedAuthority对象数组。GrantedAuthority是赋予到主体的权限,这些权限通常使用角色表示,比如ROLE_ADMINISTRATORROLE_HR_SUPERVISOR。这些角色会用于web验证,方法验证和领域对象验证。GrantedAuthority对象通常使用UserDetailsService读取,即在loadUserByUsername()方法中返回的UserDetails实例时设置。

1.3 总结

上面介绍的Spring Security中使用的核心组件及其功能如下:

  • SecurityContextHolder:提供几种保存 SecurityContext的方式
  • SecurityContext:保存Authentication信息
  • Authentication:代表Spring Security中的主体
  • GrantedAuthority:主体的权限
  • UserDetails:代表主体信息
  • UserDetailsService:加载UserDetails

2. 核心服务 - AuthenticationManager, ProviderManager 和 AuthenticationProvider

AuthenticationManager接口是认证相关的核心接口,也是认证发起的出发点,在实际需求中,应用可能即允许用户使用用户名 + 密码登录,又允许用户使用邮箱 + 密码,手机号码 + 密码等形式登录,所以要求认证系统要支持多种认证方式,因此需要一个接口定义认证的基本功能。AuthenticationManager的定义如下:

1
2
3
4
public interface AuthenticationManager {
Authentication authenticate(Authentication authentication)
throws AuthenticationException;
}

Spring Security 中 AuthenticationManager接口的默认实现是 ProviderManager, 其对Authentication authenticate(Authentication authentication)方法实现如下:

1
2
3
4
5
6
7
8
9
10
11
12
13
14
15
16
17
18
19
20
21
22
23
24
25
26
27
28
29
30
31
32
33
34
35
36
37
38
39
40
41
42
43
44
45
46
47
48
49
50
51
52
53
54
55
56
57
58
59
60
61
62
63
64
65
66
67
68
69
public Authentication authenticate(Authentication authentication)
throws AuthenticationException {
Class<? extends Authentication> toTest = authentication.getClass();
AuthenticationException lastException = null;
AuthenticationException parentException = null;
Authentication result = null;
Authentication parentResult = null;
boolean debug = logger.isDebugEnabled();

(3)for (AuthenticationProvider provider : getProviders()) {
if (!provider.supports(toTest)) {
continue;
}

try {
result = provider.authenticate(authentication);

if (result != null) {
(4)copyDetails(authentication, result);
break;
}
}
catch (AccountStatusException | InternalAuthenticationServiceException e) {
prepareException(e, authentication);
throw e;
} catch (AuthenticationException e) {
lastException = e;
}
}

if (result == null && parent != null) {
// Allow the parent to try.
try {
(5)result = parentResult = parent.authenticate(authentication);
}
catch (ProviderNotFoundException e) {
}
catch (AuthenticationException e) {
lastException = parentException = e;
}
}

if (result != null) {
if (eraseCredentialsAfterAuthentication
&& (result instanceof CredentialsContainer)) {
(6)((CredentialsContainer) result).eraseCredentials();
}

// If the parent AuthenticationManager was attempted and successful than it will publish an AuthenticationSuccessEvent
// This check prevents a duplicate AuthenticationSuccessEvent if the parent AuthenticationManager already published it
if (parentResult == null) {
eventPublisher.publishAuthenticationSuccess(result);
}
return result;
}

if (lastException == null) {
lastException = new ProviderNotFoundException(messages.getMessage(
"ProviderManager.providerNotFound",
new Object[] { toTest.getName() },
"No AuthenticationProvider found for {0}"));
}

if (parentException == null) {
prepareException(lastException, authentication);
}

(7)throw lastException;
}

(3) ProviderManager本身并不直接处理身份认证请求,而是将认证委托给AuthenticationProvider,依次查询每个列表项是否可以执行身份认证。每个 Provider 要么抛出异常要么返回一个完全填充的 Authentication对象

(4) 认证成功后,会将原始的认证信息拷贝到Provider的返回结果中

(5) 若当前ProviderManager无法完成认证操作,且其包含父级认证器,则转交给父级认证器尝试进行认证

(6) 完成认证,从authentication对象中删除私密数据,防止一些机密数据(如用户密码)过长时间保留在内存中

(7) 如果认证失败,则抛出AuthenticationException

Spring Security提供了很多认证Provider,如:

  • DaoAuthenticationProvider
  • AnonymousAuthenticationProvider
  • RememberMeAuthenticationProvider

所有的Provider都继承自AuthenticationProvider接口,代码如下:

1
2
3
4
5
6
7
8
public interface AuthenticationProvider {
// 验证请求
Authentication authenticate(Authentication authentication)
throws AuthenticationException;

// 判断是否支持对authentication的认证
boolean supports(Class<?> authentication);
}

比如在DaoAuthenticationProvider中使用UserDetailsService根据用户名获得UserDetails,再通过比对用户密码判断用户是否合法。

但是需要注意的是,在使用相应的认证机制时,必须为其提供相应的认证Provider,否则会导致认证失败。如JA-SIG CAS认证,其必须使用CasAuthenticationProvider

3. 总结

  • 应用中可以通过SecurityContextHolder获得认证信息Authentication
  • 应用可以从获得的Authentication实例中获得认证后的用户信息,如用户名和权限
  • 应用通过继承UserDetails接口定制合适的UserDetails(如新增getEmail()函数)
  • 应用通过继承UserDetailsService接口将系统中存储的用户信息转换为Spring Security的UserDetails实例
  • Spring Security中ProviderManager为认证的入口
  • ProviderManager通过AuthenticationProvider完成认证

参考

  1. Spring Security架构简介
  2. Spring Security 5.2官方文档

附录

代码1

SecurityContextHolder.getContext()代码如下:

1
2
3
public static SecurityContext getContext() {
1)return strategy.getContext();
}

(1) 默认情况下strategy的指向的是ThreadLocalSecurityContextHolderStrategy实例,代码如下:

1
2
3
4
5
6
7
8
9
10
11
private static void initialize() {
if (!StringUtils.hasText(strategyName)) {
// Set default
strategyName = MODE_THREADLOCAL;
}

if (strategyName.equals(MODE_THREADLOCAL)) {
(2) strategy = new ThreadLocalSecurityContextHolderStrategy();
}
......
}

(2) 可以确定最终调用的是ThreadLocalSecurityContextHolderStrategy实例中的getContexxt()方法,代码如下:

1
2
3
4
5
6
7
8
9
10
public SecurityContext getContext() {
(3)SecurityContext ctx = contextHolder.get();

if (ctx == null) {
ctx = createEmptyContext();
contextHolder.set(ctx);
}

return ctx;
}

(3) contextHolder的定义如下:

1
private static final ThreadLocal<SecurityContext> contextHolder = new ThreadLocal<>();

因此默认获得的SecurityContext实例是存放在ThreadLocal中的。

前言

一般我们在做Code Review时希望实现以下几个目的:

  • 传播好的编码实践
  • 让大家对所做软件更了解
  • 避免重复采坑
  • 发现方案或代码中功能性和非功能性问题,以及未考虑到的场景

很多团队在做Code Review时只是走了个形式,而没有实现真正目的。这篇博客会给大家介绍Code Review的前中后分别各做什么,从而使得Code Review形成一个闭环过程。

一般的代码合入流程

目前大多数公司都使用git来管理代码,一般开发会通过gerrit或pull request(记为PR)来合入代码,因此一个一般的代码提交流程如下:

在这里插入图片描述

Code Review之前

在做Code Review之前,至少要完成:

  • 开发需要根据需求说明书或验收条件或问题复现方式来完成自检
  • 代码通过扫描
  • 单元测试通过

我们知道对于修改量比较大的代码,Code Review还是比较占用时间的,因此Code Review不会检查诸如代码格式、if条件是否需要合并、基本功能等这些基本的问题。这些问题需要在Code Review之前由开发、自动化工具和单元测试来保证,比如Lint、Coverity、Findbug、PMD能够帮助我们发现很多潜在的bug、兼容性问题和代码规范问题,我们应该充分利用这些工具。

Code Review之中

开始Code Review时,开发人员需要确认Reviewers是否了解代码针对的需求或问题,如果不了解可以给Reviewers简单介绍一下,然后按照真实业务的流程来介绍代码,重点介绍可能存在问题的地方,Reviewers在听的时候可以随时提问,确认是问题或需要再确认的需要及时在代码中标注出来。Reviews可以根据如下清单来Review代码:

  • 代码是否很容易理解
  • 代码中是否有重复的地方
  • 代码是否容易测试和调试
  • 代码是否考虑到并发
  • 代码是否考虑到了非功能性需求,如性能、内存
  • 代码是否符合现有的软件架构
  • 代码是否符合单一职责原则(SRP)
  • 代码是否符合开闭原则(OCP)
  • 代码是否符合依赖倒置原则(OIP)

虽然具体清单项可能不同项目会有不同,但上述这些Review项一般是必须的。

Code Review之后

代码经过Code Review之后,开发人员需要针对Review过程中提出的问题进行分析和修改,修改完成后再提交新的代码,再走一遍上述流程。一般经过一次Review的代码在第二次Review时会特别快。

在这里有一点往往是团队忽略的,如果在Review时经常发现一些同类型的问题,这时就该考虑是不是团队内部对相关知识缺乏了解,是不是应该对团队进行一次相关的培训。

另外,如果我们经常Review出某一类问题,也可以考虑通过配置工具来自动扫描出相关问题。

参考

  1. Code Review Checklist – To Perform Effective Code Reviews. https://www.evoketechnologies.com/blog/code-review-checklist-perform-effective-code-reviews/

Spring Security源码阅读2-Spring Security过滤器链的初始化1文章中,遗留了如下两个问题:

  1. 在步骤(15)中,我们说HttpSecurity类中的performBuild函数返回了DefaultSecurityFilterChain类,而该类中封装了该链的所有过滤器,那么这些过滤器是如何添加进来的呢?

  2. 在步骤(17)中生成的FilterChainProxy对象也是Filter实例,那么在收到客户端请求后是如何完成过滤器链式调用的呢?

接下来我们就逐步回答上面两个问题。本文先回答问题2,因为回答问题2后,读者就可以从全视角了解Spring Security过滤器的创建和调用流程。本文中会将该问题拆的更细,按由简到繁的顺序来解答。

1. FilterChainProxy如何实现过滤器链调用

根据Filter接口的定义,可以确定每次客户端请求在经过过滤器时调用的都是doFilter函数,FilterChainProxy对doFilter函数的实现如下:

1
2
3
4
5
6
7
8
9
10
11
12
13
14
15
16
17
18
@Override
public void doFilter(ServletRequest request, ServletResponse response,
FilterChain chain) throws IOException, ServletException {
boolean clearContext = request.getAttribute(FILTER_APPLIED) == null;
if (clearContext) {
try {
request.setAttribute(FILTER_APPLIED, Boolean.TRUE);
(1)doFilterInternal(request, response, chain);
}
finally {
SecurityContextHolder.clearContext();
request.removeAttribute(FILTER_APPLIED);
}
}
else {
doFilterInternal(request, response, chain);
}
}

(1) 派发到过滤器链上执行,可以看到doFilter调用的是FilterChainProxy实例的内部函数doFilterInternal,其代码如下:

1
2
3
4
5
6
7
8
9
10
11
12
13
14
15
16
17
18
19
20
21
22
23
24
25
26
27
private void doFilterInternal(ServletRequest request, ServletResponse response,
FilterChain chain) throws IOException, ServletException {

FirewalledRequest fwRequest = firewall
.getFirewalledRequest((HttpServletRequest) request);
HttpServletResponse fwResponse = firewall
.getFirewalledResponse((HttpServletResponse) response);

(2)List<Filter> filters = getFilters(fwRequest);

if (filters == null || filters.size() == 0) {
if (logger.isDebugEnabled()) {
logger.debug(UrlUtils.buildRequestUrl(fwRequest)
+ (filters == null ? " has no matching filters"
: " has an empty filter list"));
}

fwRequest.reset();

(3)chain.doFilter(fwRequest, fwResponse);

return;
}

(4)VirtualFilterChain vfc = new VirtualFilterChain(fwRequest, chain, filters);
(5)vfc.doFilter(fwRequest, fwResponse);
}

(2) 根据每个过滤器链配置的RequestMathcher,决定每一个请求要经过哪些过滤器。(参考Spring Security源码阅读2-Spring Security过滤器链的初始化1第(15)步,HttpSecurity在返回performBuild中返回的是DefaultSecurityFilterChain类的实例,而在创造DefaultSecurityFilterChain实例时传递的RequestMatcher实例是AnyRequestMatcher.INSTANCE,其matches函数默认返回true,请参考附录代码一)。

(3) 如果当前过滤器链没有匹配的过滤器,则执行下一条过滤器链。

(4) 将所有的过滤器合并成一个虚拟过滤器链。

(5) 执行虚拟过滤器链。

可以看到最终执行的是虚拟过滤器链VirtualFilterChain类的实例,接下来看看VirtualFilterChain类doFilter的实现:

1
2
3
4
5
6
7
8
9
10
11
12
13
14
15
16
17
18
19
20
21
22
23
24
25
26
27
28
29
30
@Override
public void doFilter(ServletRequest request, ServletResponse response)
throws IOException, ServletException {
if (currentPosition == size) {
if (logger.isDebugEnabled()) {
logger.debug(UrlUtils.buildRequestUrl(firewalledRequest)
+ " reached end of additional filter chain; proceeding with original chain");
}

// Deactivate path stripping as we exit the security filter chain
this.firewalledRequest.reset();

(6)originalChain.doFilter(request, response);
}
else {
currentPosition++;

(7)Filter nextFilter = additionalFilters.get(currentPosition - 1);

if (logger.isDebugEnabled()) {
logger.debug(UrlUtils.buildRequestUrl(firewalledRequest)
+ " at position " + currentPosition + " of " + size
+ " in additional filter chain; firing Filter: '"
+ nextFilter.getClass().getSimpleName() + "'");
}

(8)nextFilter.doFilter(request, response, this);
}
}
}

(6) 如果当前虚拟过滤器链上的所有过滤器都已经执行完毕,则执行原生过滤器链上的剩余逻辑。

(7) 获得当前虚拟过滤器链上的下一个过滤器。

(8) 执行过滤器。doFilter的函数原型定义如下:

1
2
public void doFilter(ServletRequest request, ServletResponse response,
FilterChain chain) throws IOException, ServletException;

我们可以看到第三个参数传递的是this,即当前虚拟过滤器链实例。因此,当在nextFilter的doFilter函数中再次通过chain参数调用doFilter函数时,则会再次调用到当前虚拟过滤器链实例(伪代码如下),从而完成虚拟过滤器链上的所有过滤器的调用 。

1
2
3
4
5
6
public void doFilter(ServletRequest request, ServletResponse response,
FilterChain chain) throws IOException, ServletException {
......
chain.doFilter(request, response, chain); //这里的chain是传进来的VirtualFilterChain实例
......
}

以上就是FilterChainProxy实现过滤器链调用的全过程。

接下来讨论一下客户端请求是如何传递到过滤器的,但是要了解请求传递到过滤器的过程,就必须得清楚过滤器在Servlet容器中注册的是什么。

2. Spring Security过滤器如何注册到Servlet容器

这里先说明一下,为什么本节的标题用的是过滤器而非过滤器链,因为本文第一节已经分析了FilterChainProxy实现过滤器链调用的原理,而FilterChainProxy本质上也是一个Filter实例。

在IDE中启动Spring应用默认使用的是Spring Boot内嵌的Tomcat容器,因此这里讨论的Servlet容器指的是Tomcat的Servlet容器。在启动Spring应用时会向IoC注册securityFilterChainRegistration Bean:

1
2
3
4
5
6
7
8
9
10
11
12
13
14
15
16
17
18
19
20
21
@Configuration(proxyBeanMethods = false)
@ConditionalOnWebApplication(type = Type.SERVLET)
@EnableConfigurationProperties(SecurityProperties.class)
@ConditionalOnClass({ AbstractSecurityWebApplicationInitializer.class, SessionCreationPolicy.class })
@AutoConfigureAfter(SecurityAutoConfiguration.class)
public class SecurityFilterAutoConfiguration {

private static final String DEFAULT_FILTER_NAME = AbstractSecurityWebApplicationInitializer.DEFAULT_FILTER_NAME;

@Bean
@ConditionalOnBean(name = DEFAULT_FILTER_NAME)
public DelegatingFilterProxyRegistrationBean securityFilterChainRegistration(
SecurityProperties securityProperties) {
(9)DelegatingFilterProxyRegistrationBean registration = new DelegatingFilterProxyRegistrationBean(
DEFAULT_FILTER_NAME);
registration.setOrder(securityProperties.getFilter().getOrder());
registration.setDispatcherTypes(getDispatcherTypes(securityProperties));
return registration;
}
......
}

(9) DelegatingFilterProxyRegistrationBean实现了ServletContextInitializer接口,该接口用于配置Servlet上下文。DelegatingFilterProxyRegistrationBean目的是向Servlet容器中注册一个过滤器:实现类为 DelegatingFilterProxy 的一个 Servlet Filter。DelegatingFilterProxy 其实是一个代理过滤器,它被 Servlet 容器用于匹配特定URL模式的请求,而它会将任务委托给Spring管理的Bean,即名字为 springSecurityFilterChain 的Bean,而springSecurityFilterChain正是Spring Security源码阅读2-Spring Security过滤器链的初始化1中介绍的,从而实现了Servlet容器管理的DelegatingFilterProxy与Spring容器创建的springSecurityFilterChain Bean的关联。关于这一段结论的代码分析,请参考附录代码二。

为了加深对DelegatingFilterProxy的理解,我们可以看下其注释:

1
2
3
4
5
/*Proxy for a standard Servlet Filter, delegating to a Spring-managed bean that
* implements the Filter interface. Supports a "targetBeanName" filter init-param
* in {@code web.xml}, specifying the name of the target bean in the Spring
* application context.
*/

清楚了Servlet容器管理的DelegatingFilterProxy与Spring容器创建的springSecurityFilterChain Bean的关联,接下来就可以分析客户端请求如何传递到过滤器。

3. 客户端请求如何传递到过滤器

当用户请求到来并且与过滤器的URL模式匹配后,会调用DelegatingFilterProxy的doFilter函数:

1
2
3
4
5
6
7
8
9
10
11
12
13
14
15
16
17
18
19
20
21
22
23
24
 @Override
public void doFilter(ServletRequest request, ServletResponse response, FilterChain filterChain)
throws ServletException, IOException {

// Lazily initialize the delegate if necessary.
Filter delegateToUse = this.delegate;
if (delegateToUse == null) {
synchronized (this.delegateMonitor) {
delegateToUse = this.delegate;
if (delegateToUse == null) {
WebApplicationContext wac = findWebApplicationContext();
if (wac == null) {
throw new IllegalStateException("No WebApplicationContext found: " +
"no ContextLoaderListener or DispatcherServlet registered?");
}
(10)delegateToUse = initDelegate(wac);
}
this.delegate = delegateToUse;
}
}

// Let the delegate perform the actual doFilter operation.
(11)invokeDelegate(delegateToUse, request, response, filterChain);
}

(10) 获得Spring容器管理的springSecurityFilterChain Bean.

(11) 调用FilterChainProxy的doFilter函数,代码如下:

1
2
3
4
5
6
protected void invokeDelegate(
Filter delegate, ServletRequest request, ServletResponse response, FilterChain filterChain)
throws ServletException, IOException {

delegate.doFilter(request, response, filterChain);
}

以上就是Spring Security过滤器的调用和执行流程。在整个分析中,为了分析的简单和文章不至于太长,我并没有详细分析Servlet容器和Spring IoC容器的交互过程,有兴趣的读者可以自行分析。

附录

1. 代码一

HttpSecurity.java

1
2
3
4
5
6
7
private RequestMatcher requestMatcher = AnyRequestMatcher.INSTANCE;

@Override
protected DefaultSecurityFilterChain performBuild() {
filters.sort(comparator);
return new DefaultSecurityFilterChain(requestMatcher, filters);
}

2. 代码二

我们直接从ServletWebServerApplicationContext类开始分析,因为在Servlet类型应用中,实际实例化的应用上下文为ServletWebServerApplicationContext。为什么会如此,读者可以分析一下Spring Boot的启动流程。

1
2
3
4
5
6
7
8
9
10
11
12
13
14
15
16
17
18
  /**
* Returns the {@link ServletContextInitializer} that will be used to complete the
* setup of this {@link WebApplicationContext}.
* @return the self initializer
* @see #prepareWebApplicationContext(ServletContext)
*/
private org.springframework.boot.web.servlet.ServletContextInitializer getSelfInitializer() {
return this::selfInitialize;
}

private void selfInitialize(ServletContext servletContext) throws ServletException {
prepareWebApplicationContext(servletContext);
registerApplicationScope(servletContext);
WebApplicationContextUtils.registerEnvironmentBeans(getBeanFactory(), servletContext);
(1)for (ServletContextInitializer beans : getServletContextInitializerBeans()) {
beans.onStartup(servletContext);
}
}

(1) 回调所有ServletContextInitializer的onStart函数。通过调试,ServletWebServerApplicationContext中有如下这些ServletContextInitializer:

image-20200220112615616

可以看到DelegatingFilterProxyRegistrationBean类的实例,再看看其onStart回调函数,其最终回调的是addRegistration函数(DelegatingFilterProxyRegistrationBean继承自AbstractFilterRegistrationBean,该函数位于其中):

1
2
3
4
5
 @Override
protected Dynamic addRegistration(String description, ServletContext servletContext) {
Filter filter = getFilter();
(2)return servletContext.addFilter(getOrDeduceName(filter), filter);
}

(2) 通过调用DelegatingFilterProxyRegistrationBean中的getFilter函数获得DelegatingFilterProxy类的实例,并将基添加到Servlet上下文中,最终将过滤器添加到StandardContext(这个就是Tomcat的上下文了,从而建立了Tomcat容器与Spring的关系)的filterDefs属性中。

Spring Security的核心实现是通过一条过滤器链来确定用户的每一个请求应该得到什么样的反馈。

1. 使用@EnableWebSecurity注解开启Spring Security

在使用Spring Security时首先要通过@EnableWebSecurity注解开启Spring Security的默认行为。

1
2
3
4
5
6
7
8
9
10
11
@Retention(value = java.lang.annotation.RetentionPolicy.RUNTIME)
@Target(value = { java.lang.annotation.ElementType.TYPE})
@Documented
@Import({ WebSecurityConfiguration.class,
SpringWebMvcImportSelector.class,
OAuth2ImportSelector.class })
@EnableGlobalAuthentication
@Configuration
public @interface EnableWebSecurity {
boolean debug() default false;
}

该注解通过@Import注解将WebSecurityConfiguration类导入到Spring 的IoC容器,从而对Spring Security进行初始化。同时,@EnableWebSecurity可以通过配置debug = true开启调试模式,能够打印出Spring Security运行时的详细信息,如下:

img

接下来,我们看看上图中的过滤器是如何加载到过滤器链中的。

2. WebSecurityConfiguration

首先看WebSecurityConfiguration类中的setFilterChainProxySecurityConfigurer函数,该函数用来初始化SecurityConfigurer列表:

1
2
3
4
5
6
7
8
9
10
11
12
13
14
15
16
17
18
19
20
21
22
23
24
25
26
27
28
29
30
31
@Autowired(required = false)
public void setFilterChainProxySecurityConfigurer(
ObjectPostProcessor<Object> objectPostProcessor,
1)@Value("#{@autowiredWebSecurityConfigurersIgnoreParents.getWebSecurityConfigurers()}") List<SecurityConfigurer<Filter, WebSecurity>> webSecurityConfigurers)
throws Exception {
(2)webSecurity = objectPostProcessor
.postProcess(new WebSecurity(objectPostProcessor));
if (debugEnabled != null) {
webSecurity.debug(debugEnabled);
}

(3)webSecurityConfigurers.sort(AnnotationAwareOrderComparator.INSTANCE);

Integer previousOrder = null;
Object previousConfig = null;
4for (SecurityConfigurer<Filter, WebSecurity> config : webSecurityConfigurers) {
Integer order = AnnotationAwareOrderComparator.lookupOrder**(config);
if (previousOrder != null && previousOrder.equals(order)) {
throw new IllegalStateException(
"@Order on WebSecurityConfigurers must be unique. Order of "
\+ order + " was already used on " + previousConfig + ", so it cannot be used on "
\+ config + " too.");
}
previousOrder = order;
previousConfig = config;
}
5for (SecurityConfigurer<Filter, WebSecurity> webSecurityConfigurer : webSecurityConfigurers) {
webSecurity.apply(webSecurityConfigurer);
}
this.webSecurityConfigurers = webSecurityConfigurers;
}

(1)在传入的参数中,objectPostProcess用于初始化对象,暂时不用关注。webSecurityConfigurers是通过SpEL调用Bean的方法获得的值,其获得的是我们在配置Spring Security时继承自WebSecurityConfigurerAdapter的配置类(具体代码见:AutowiredWebSecurityConfigurersIgnoreParents类的getWebSecurityConfigurers方法)。

(2)初始化WebSecurity。

(3)对webSecurityConfigurers按升序进行排序(排序算法是稳定的),如果一个应用中有多个SecurityConfigurer,可通过@Order注解指定其顺序,注解中的值越大,SecurityConfigurer排序后越靠后。继承自WebSecurityConfigurerAdapter的配置类其@Order注解的默认值为100。该步骤的作用是为第(4)步检查重复的@Order注解值做准备。

(4)检查多个SecurityConfigurer配置的@Order注解值是否相同,如果相同则报错。这就说明如果代码中通过继承自WebSecurityConfigurerAdapter配置了多个SecurityConfigurer,则必须为每个SecurityConfigurer设置@Order注解,并且注解值不能相同。

(5)将配置的每一个SecurityConfigurer应用到WebSecurity。这里我们顺便看下WebSecurity类的apply函数(WebSecurity继承自AbstractConfiguredSecurityBuilder,apply函数位于AbstractConfiguredSecurityBuilder中。),因为后面的代码分析会用到。

1
2
3
4
5
6
7
8
9
10
11
12
13
14
15
16
17
18
19
20
21
22
23
24
25
26
27
public <C extends SecurityConfigurer<O, B>> C apply(C configurer) throws Exception {
add(configurer);
return configurer;
}

private <C extends SecurityConfigurer<O, B>> void add(C configurer) {
Assert.notNull(configurer, "configurer cannot be null");

Class<? extends SecurityConfigurer<O, B>> clazz = (Class<? extends SecurityConfigurer<O, B>>) configurer
.getClass();
synchronized (configurers) {
if (buildState.isConfigured()) {
throw new IllegalStateException("Cannot apply " + configurer
\+ " to already built object");
}
List<SecurityConfigurer<O, B>> configs = allowConfigurersOfSameType ? this.configurers
.get(clazz) : null;
if (configs == null) {
configs = new ArrayList<>(1);
}
configs.add(configurer);
6this.configurers.put(clazz, configs);
if (buildState.isInitializing()) {
this.configurersAddedInInitializing.add(configurer);
}
}
}

可以看到apply函数主要调用add函数,并在add函数中将SecurityConfigurer添加到WebSecurity类的configures属性,键值为clazz(第(6)步)。注意此时WebSecurity中的buildState的状态为UNBUILT。

回到WebSecurityConfiguration中,我们再看其另一个函数:springSecurityFilterChain,该函数返回Filter,用于创建Spring Security过滤器链,代码如下:

1
2
3
4
5
6
7
8
9
10
11
12
@Bean(name = AbstractSecurityWebApplicationInitializer.DEFAULT_FILTER_NAME)
public Filter springSecurityFilterChain() throws Exception {
boolean hasConfigurers = webSecurityConfigurers != null
&& !webSecurityConfigurers.isEmpty();
(7)if (!hasConfigurers) {
WebSecurityConfigurerAdapter adapter = objectObjectPostProcessor
.postProcess(new WebSecurityConfigurerAdapter() {
});
webSecurity.apply(adapter);
}
(8)return webSecurity.build();
}

(7) 如果没有通过继承WebSecurityConfigurerAdatper类配置过Spring Security,则会以WebSecurityConfigurerAdatper中的配置默认行为。

(8) 调用WebSecurity类的build方法构建过滤器链。

接下来将讲到最核心的过滤器链的构建,首先看下WebSecurity类中的build函数(WebSecurity继承自AbstractConfiguredSecurityBuilder类,而后者又继承自AbstractSecurityBuilder类,build函数位于AbstractSecurityBuilder类中),代码为:

1
2
3
4
5
6
7
public final O build() throws Exception {
if (this.building.compareAndSet(false, true)) {
9this.object = doBuild();
return this.object;
}
throw new AlreadyBuiltException("This object has already been built");
}

可以看到最终调用的是doBuild函数(位于AbstractConfiguredSecurityBuilder类中),代码如下:

1
2
3
4
5
6
7
8
9
10
11
12
13
14
15
16
17
18
19
20
21
22
@Override
protected final O doBuild() throws Exception {
synchronized (configurers) {
buildState = BuildState.INITIALIZING;

(10)beforeInit();
(11)init();

buildState = BuildState.CONFIGURING;

(12)beforeConfigure();
(13)configure();

buildState = BuildState.BUILDING;

(14)O result = performBuild();

buildState = BuildState.BUILT;

return result;
}
}

(10) 默认该函数为空。

(11) 初始化SecurityConfigurer,初始化的SecurityConfigurer为前面讲的setFilterChainProxySecurityConfigurer函数调用apply函数时设置的,最终调用的是WebSecurityConfigurerAdapter的init函数,将所有的HttpSecurity添加到WebSecurity中。

(12) 默认该函数为空。

(13) 调用WebSecurityConfigurerAdapter中的configure(WebSecurity web)函数,默认为空。

(14) 完成过滤器链的构建。

从上面的步骤可以看出,只有第(11)和第(14)步才真正做了操作,而第(14)步才是真正构建过滤器链的操作。因此,接下来将看performBuild函数(位于WebSecurity类中),代码如下:

1
2
3
4
5
6
7
8
9
10
11
12
13
14
15
16
17
18
19
20
21
22
23
24
25
26
27
28
29
30
31
32
33
34
35
36
37
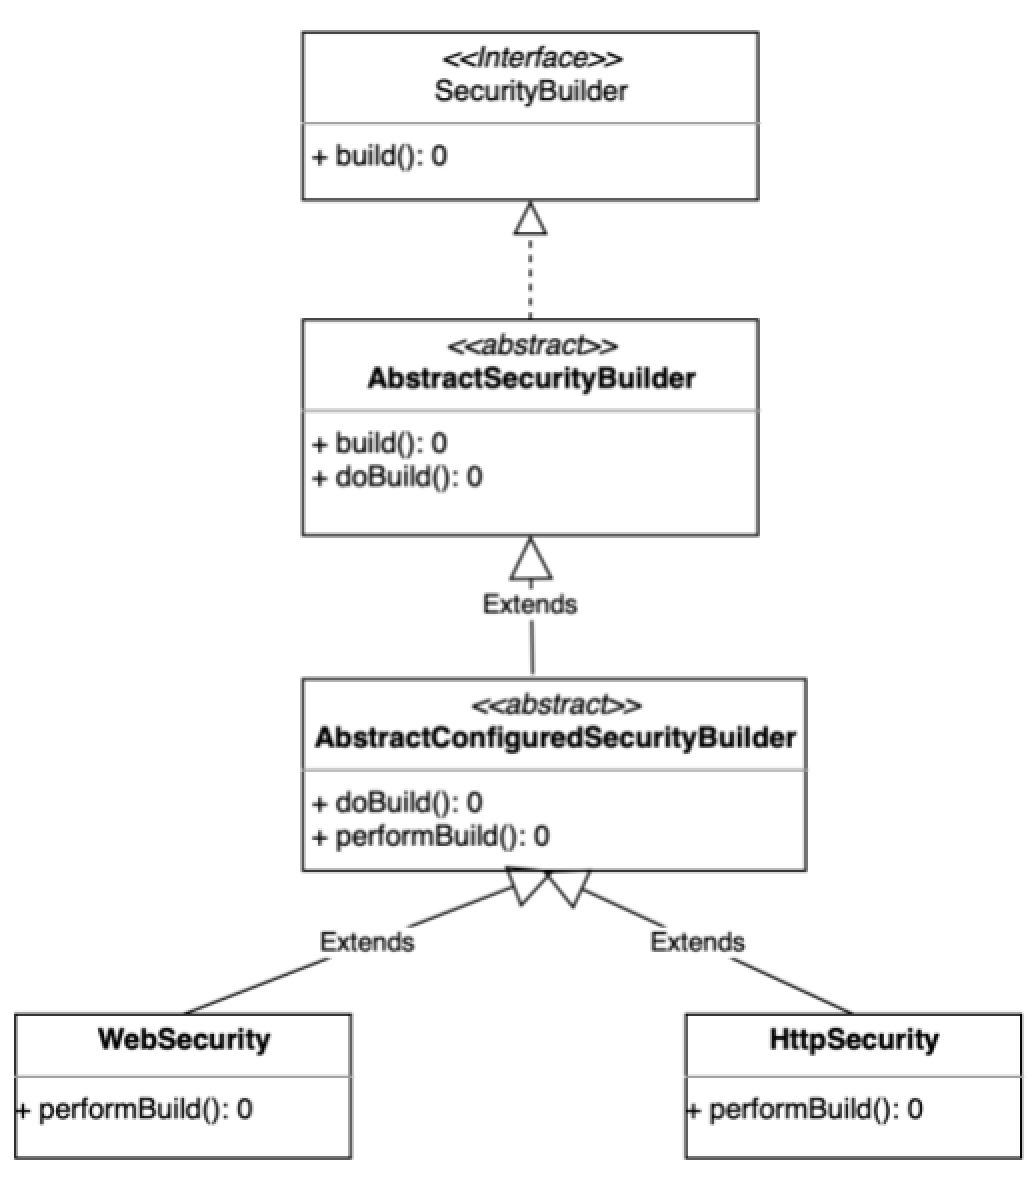
@Override
protected Filter performBuild() throws Exception {
Assert.state(
!securityFilterChainBuilders.isEmpty(),
() -> "At least one SecurityBuilder<? extends SecurityFilterChain> needs to be specified. "
\+ "Typically this done by adding a @Configuration that extends WebSecurityConfigurerAdapter. "
\+ "More advanced users can invoke "
\+ WebSecurity.class.getSimpleName()
\+ ".addSecurityFilterChainBuilder directly");
int chainSize = ignoredRequests.size() + securityFilterChainBuilders.size();
List<SecurityFilterChain> securityFilterChains = new ArrayList<>(
chainSize);
for (RequestMatcher ignoredRequest : ignoredRequests) {
securityFilterChains.add(new DefaultSecurityFilterChain(ignoredRequest));
}
15for (SecurityBuilder<? extends SecurityFilterChain> securityFilterChainBuilder : securityFilterChainBuilders) {
securityFilterChains.add(securityFilterChainBuilder.build());
}
16)FilterChainProxy filterChainProxy = new FilterChainProxy(securityFilterChains);
if (httpFirewall != null) {
filterChainProxy.setFirewall(httpFirewall);
}
filterChainProxy.afterPropertiesSet();

Filter result = filterChainProxy;
if (debugEnabled) {
logger.warn("\n\n"
\+ "********************************************************************\n"
\+ "********** Security debugging is enabled. *************\n"
\+ "********** This may include sensitive information. *************\n"
\+ "********** Do not use in a production system! *************\n"
\+ "********************************************************************\n\n");
result = new DebugFilter(filterChainProxy);
}
postBuildAction.run();
(17)return result;
}

(15) 为每一个securityFilterChainBuilder生成过滤器链,securityFilterChainBuilders集合中的内容是我们在第(11)步中设置的HttpSecurity。这里请注意一点,即WebSecurity和HttpSecurity有相同的继承结构,如下:

img

因此,参考步骤(10)~(14),可以确定最终调用的是HttpSecurity下的performBuild函数,如下:

1
2
3
4
5
@Override
protected DefaultSecurityFilterChain performBuild() {
filters.sort(comparator);
return new DefaultSecurityFilterChain(requestMatcher, filters);
}

可以看到最终返回的是DefaultSecurityFilterChain类,该类中包含了过滤器链中的所有过滤器。

(16) 将生成的过滤器链securityFilterChains由FilterChainProxy来代理,FilterChainProxy间接实现了Filter接口。

(17) 将FilterChainProxy对象返回

以上就是是过滤器链的生成过成,目前遗留了两个问题在接下来的文章中分析:

  1. 在步骤(15)中,我们说HttpSecurity类中的performBuild函数返回了DefaultSecurityFilterChain类,而该类中封装了该链的所有过滤器,那么这些过滤器是如何添加进来的呢?

  2. 在步骤(17)中生成的FilterChainProxy对象也是Filter实例,那么在收到客户端请求后是如何完成过滤器链式调用的呢?

1. 团队协作的五大障碍

团队协作的五大障碍出自《团队协作的五大障碍》这本书,书中的五大障碍是指:

image-20200214175738637

  • 缺乏信任:该问题源于团队成员大都害怕成为别人攻击的对象,害怕在他人面前犯错误。大家不愿意敞开心扉,承认自己的缺点和弱项,从而导致无法建立相互信任的基础。

  • 无法建立相互信任为第二障碍–惧怕冲突–奠定了基础,缺乏信任的团队无法产生直接而激烈的思想交锋,取而代之的是毫无针对性的讨论以及无关痛痒的意见。

  • 缺乏必要的争论之所以成为不利的问题,是因为它必然致使团队协作面临第三大障碍:欠缺投入。团队成员如果不能切实投入,在热烈、公开的辩论中表达自己的意见,他们即使表面上在会议中达成一致,也 很少能够真正统一意>见,作出决策。

  • 因为投入不够,且实际上并没有达成共识,团队成员就会逃避责任。由于没有在计划或行动上真正达成一致,所以即使最认真负责的人发现同事的行为有损集体利益的时候 ,也会犹豫不决而不予以指出。

  • 如果团队成员不能相互负责、督促,第五大障碍就有了赖以滋生的土壤。当团队成员把个人的需要(如个人利益、职业前途或能力认可)或甚至他们的分支部门的利益放在整个团队的共同利益之上时,就导致了无视结果。

因此,由于五大障碍的连锁反应,只要写下大障碍中有一项发生,整个团队都会深受其害。

2. 团结一致团队的特征

一个没有这五大障碍的团队特征是:

  • 成员之间相互信任
  • 针对不同意见进行直接的辩论
  • 积极投入到决策和行动计划中去
  • 对影响工作计划的行为负责
  • 把重点放在集体成绩上

3. 五大障碍在团队中的表现

有该障碍的表现 无该障碍的表现
缺乏信任 1. 隐藏自己的缺点和错误
2. 不愿请求别人帮助,也不愿给别人提出建设性的反馈意见
3. 不愿为别人提供自己职责之外的帮助
4. 轻易对别人的用意和观点下结论而不去仔细思考
5. 不愿承认和学习别人的技术和经验
6. 浪费时间和精力去追求自己的特定目标
7. 对别人抱有不满和怨恨
8. 惧怕开会,寻找借口,尽量减少在一起的时间
1. 承认自己的弱点和错误
2. 主动寻求别人的帮助
3. 欢迎别人对自己所负责的领域提出问题和给予关注
4. 在工作可能出现问题时,相互提醒
5. 愿意给别人提出反馈意见和帮助
6. 赞赏并且学习别人的技术和经验
7. 把时间和精力花在解决实际问题上,而不是流于形式
8. 必要时向别人道歉,接受别人的道歉
9. 珍惜集体会议或其他可以进行团队协作的机会
惧怕冲突 1. 团队会议非常枯燥
2. 使用不正当手段在别人背后进行人身攻击
3. 避免讨论容易引起争论的问题,而这些问题对于团队协作成功是非常必要的
4. 不能正确处理团队成员之间的意见和建议
5. 把时间和精力浪费在表面形式上
1. 召开活跃、有趣的会议
2. 汲取所有团队成员的意见
3. 快速地解决实际问题
4. 将形式主义控制在最小限度
5. 把大家持不同意见的问题拿出来讨论
欠缺投入 1. 团队的指令和主要工作任务模糊
2. 由于不必要的拖延和过多的分析而错过商机
3. 大家缺乏自信,惧怕失败
4. 反复讨论,无法作出决定
5. 团队成员对已经作出的决定反复提出质疑
1. 制定出明确的工作方向和工作重点
2. 公平听取全体成员的意见
3. 培养从失误中学习的能力
4. 在竞争对手采取行动之前把握住商机
5. 毫不犹豫,勇往直前
6. 必要时果断调整工作方向,不犹豫也不没完没了地内疚
逃避责任 1. 成员对于团队里工作表现突出的同事必怀怨恨
2. 甘于平庸
3. 缺乏明确的时间观念
4. 把责任压在团队领导一个人身上
1. 确保让表现不尽如人意的成员感到压力,使其尽快改进工作
2. 发现潜在问题时毫无顾虑地向同事指出
3. 尊重团队中以高标准要求工作的同事
4. 免除绩效管理及改进计划这类过度形式主义的措施
无视(集体)结果 1. 无法取得进步
2. 无法战胜竞争对手
3. 失去得力的员工
4. 鼓动团队成员注重个人职业前途和目标
5. 很容易解体
1. 有得力的员工加入
2. 不提倡注重个人表现
3. 正确对待成功和失败
4. 团队成员能够为团队利益特征个人利益
5. 凝聚力强,不会轻易解体

4. 五大障碍对团队管理的指导

  • 刚进入团队时,先要对团队进行评估,评估方式可以是一对一沟通、观察、问卷调查等形式。评估结果总结成如下形式

    五大障碍 缺乏信任 惧怕冲突 欠缺投入 逃避责任 无视结果
    评估结果
    根因分析
  • 根据评估结果,为五大障碍分别制定应对之道并落地执行,如:

    可行方法 领导责任 注意事项
    缺乏信任 1. 个人背景介绍
    2. 成员工作效率讨论
    3. 360度意见反馈
    4. 集体外出实践
    5. 个人行为 特点测试
    1. 建立安全的环境
    2. 领导要做表率,并真诚的分析自己的不足
    1. 问题的设置不能>过于敏感
    3. 要同正式的工作表现评价颧审核完全分开来
    惧怕冲突 1. 挖掘争论话题
    2. 实时提醒
    1. 冷静审视
    2. 参与讨论
    欠缺投入 1. 统一口径
    2. 确定最终期限
    1. 接受可能作出错误决策的事实
    2. 敦促成员关注实际情况、遵守团队制定的时间计划
    逃避责任 1. 公布工作目标和标准
    2. 定期对成果进行简要回顾
    3. 团队嘉奖
    1. 为团队建立整体的责任机制
    2. 团队整体责任机制失效时出面干预并解决问题
    无视结果 1. 公布工作目标
    2. 奖励集体成就
    1. 强调集体成就
    2. 客观、公正
    3. 奖励为集体利益作出贡献的成员

1. 分层软件架构

分层架构是软件的软件中最常用的架构设计方法,如clean架构、MVP架构等。

Clean架构
MVP架构

分层的实质是隔离关注点,使得每一层具有一致的行为,这样不同的开发才有可能关注不同的软件层。如WEB开发中常用的前后端分离,前端关注的是用户体验,后端关注的是稳定可靠的服务。再比如DDD中主张将领域和应用进行分离,从而能够获得一个比较稳定的领域能力层。

解耦的本质是分离变化点,将不同的变化点分离到不同的层次或模块中,使得其职责更单一,从而有利于软件的开发、维护和扩展。

因为用户对其完成某一系列业务case的完整性并没有随着解耦而消失,因此在分层的软件架构中除了分和解,还要有合。通过聚合层、各类中间件sdk等来完成用户的具体业务case。

分、解、合中,分和解是软件研发组织内部的诉求,不是用户诉求,主要完成用户界面、业务逻辑和数据存储几大类任务的分层和解耦。合是基于分和解的结果,实际是其难度更大,否则会造成合的结果耦合过重导致难于维护。因此,分和解时要考虑到合,只有同时考虑到分、解、合的架构才是一个完整的架构。

2. 各软件层间的数据解耦和转换

采用分层的软件架构后,在各个软件层上都要有自己的数据模型,但由于用户业务的完整性,各个软件层的数据又需要相互转换,从而完成软件的“分”与“合”。各个软件层的数据模型一般要满足如下约束:

  • 每个软件层只能使用自己的数据模型

  • 软件层间的数据模型通过转换器相互转换

分层架构中常用的数据模型是VO、DTO、 DO和PO,解析如下:

  • VO(View Object):视图对象,用于表示层,它的作用是封装页面(或组件)的数据

  • DTO(Data Transfer Object):数据传输对象,用于表示层与服务层之间的数据传输对象

  • DO(Domain Object):领域对象,从现实世界中抽象出来的有形或无形的业务实体

  • PO(Persistent Object):持久化对象,它跟持久层(通常是数据库)的数据结构形成一一对应的映射关系,如果持久层是关系型数据库,那么,数据表中的每个字段(或若干个)就对应PO的一个(或若干个)属性

其中,各个数据模型的转换关系如下:
VO DTO DO PO转换关系

  • 用户发出请求,其请求中的数据在UI层表示为VO

  • UI层把VO转换为业务层对应方法所要求的DTO并传送给服务层(在WEB开发中,DTO为API接收到的参数)

  • 业务层首先根据DTO的数据构造(或重建)一个DO,调用DO的业务方法完成具体业务

  • 业务层把DO转换为存储层对应的PO,调用相应的存储层的持久化方法,把PO传递给它,完成存储操作

  • 对于逆向操作,如读取,也采取类似的方法进行转换和传递

在本教程中,我们将会使用 Travis CI 将 Hexo 博客部署到 GitHub Pages 上,并配置Next主题。

安装Hexo

在本地依次执行如下命令,

1
2
3
4
5
npm install hexo-cli -g
hexo init blog
cd blog
npm install
hexo server

此时在本地浏览器上访问http://localhost:4000 可以看到使用默认主题的博客主页。

将 Hexo 部署到 GitHub Pages

  • 新建一个 repository,并将 repository 命名为 <你的 GitHub 用户名>.github.io
  • Travis CI 添加到你的 GitHub 账户中
  • 前往 GitHub 的 Applications settings,配置 Travis CI 权限,使其能够访问你的 repository
  • 前往 GitHub Personal Access Token,只勾选 repo 的权限并生成一个新的 Token。Token 生成后请复制并保存好
  • 使用github账号登录Travis CI,前往你的 repository 的设置页面,在 Environment Variables 下新建一个环境变量,Name 为 GH_TOKEN,Value 为刚才你在 GitHub 生成的 Token。确保 DISPLAY VALUE IN BUILD LOG 保持 不被勾选 避免你的 Token 泄漏。点击 Add 保存
  • 在上一节新建的 Hexo 站点文件夹中新建一个 .travis.yml 文件,内容如下:
    1
    2
    3
    4
    5
    6
    7
    8
    9
    10
    11
    12
    13
    14
    15
    16
    17
    18
    19
    sudo: false
    language: node_js
    node_js:
    - 10 # use nodejs v10 LTS
    cache: npm
    branches:
    only:
    - development # build development branch only
    script:
    - hexo generate # generate static files
    deploy:
    provider: pages
    skip-cleanup: true
    github-token: $GH_TOKEN
    keep-history: true
    target-branch: master #部署到master分支
    on:
    branch: development
    local-dir: public
  • 将上一节生成的文件推送到 repository 中的development分支。

    设置Theme Next

  • 进入到Hexo 站点根目录,执行如下命令
    git clone https://github.com/theme-next/hexo-theme-next themes/next
  • 配置根目录下的_config.yml,配置结果如下:
    1
    2
    3
    4
    # Extensions
    ## Plugins: https://hexo.io/plugins/
    ## Themes: https://hexo.io/themes/
    theme: next
  • 进入到themes/next,执行如下命令将next主题切换到v7.7.0,否则在编译时会出现”TypeError: Cannot read property ‘path’ of undefined”错误:
    1
    git check tag/v7.7.0
  • 重新编译hexo工程,并访问http://localhost:4000 可以看到应用新样式后的首页

    配置博客

  • 请参考配置配置博客的title, subtitle, description等
  • 请参考hero-theme-nextTheme Next主题